


Youthphoria Beauty
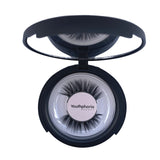
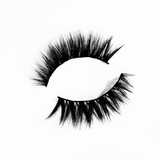
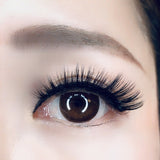
Youthphoria Beauty Signature Faux Silk - Diamond
The innovative variation of clusters offers spurts of volume and depth exactly where needed. The diamond magnetic eyelash is suitable to wear everyday due to its modest length, perfect for day to night glam.
From flirty to seductive to glamorous, the Diamond lashes has you covered! This magnetic lash will make transitioning from a spectacular day to a stunning night a breeze. It's created from high quality faux silk, making them lightweight and soft to touch whilst looking dramatic and full bodied.
Directions:
Step 1. Try on the magnetic eyelashes - try on the lashes to check its fit, and trim if needed.
- The magnetic lashes should run across your upper lash line along your eyelid. Remember to ensure magnets are at the very end of the inner and outer sides of the lashes. This will help the lashes grip, meaning a more natural, comfortable look for you.
Step 2. Apply your magnetic eyeliner - ensure your eyelids are clean and dry.
- Shake the bottle and then apply a thick and even line of the magnetic liner on your natural lash line above your eyelids.
- While the liner is magnetic, you can also use as a normal liner. Just make sure you line the inner and outer corner of your lash line to ensure maximum grip. Let the liner dry for approximately 10 seconds and until the eyeliner is slightly tacky (about 80% dry).
Tip: apply two coats for extra strength. A thin line of magnetic eyeliner can be achieved by scraping the brush-tip against the inside of the eyeliner container.
Step 3. Magnetise your lashes onto the magnetic eyeliner - Using your fingers, place the magnetic lashes on the top liner you applied in step 2.
- Begin applying the lash from the inner corner to the outer corner of your lash line. This will allow the magnets to softly snap into place, one by one.
- Press the lashes into place. Firmly press the lashes onto the liner to ensure a secure attachment.
And voila! You're done!
;
Step 1. Try on the magnetic eyelashes - try on the lashes to check its fit, and trim if needed.
- The magnetic lashes should run across your upper lash line along your eyelid. Remember to ensure magnets are at the very end of the inner and outer sides of the lashes. This will help the lashes grip, meaning a more natural, comfortable look for you.
Step 2. Apply your magnetic eyeliner - ensure your eyelids are clean and dry.
- Shake the bottle and then apply a thick and even line of the magnetic liner on your natural lash line above your eyelids.
- While the liner is magnetic, you can also use as a normal liner. Just make sure you line the inner and outer corner of your lash line to ensure maximum grip. Let the liner dry for approximately 10 seconds and until the eyeliner is slightly tacky (about 80% dry).
Tip: apply two coats for extra strength. A thin line of magnetic eyeliner can be achieved by scraping the brush-tip against the inside of the eyeliner container.
Step 3. Magnetise your lashes onto the magnetic eyeliner - Using your fingers, place the magnetic lashes on the top liner you applied in step 2.
- Begin applying the lash from the inner corner to the outer corner of your lash line. This will allow the magnets to softly snap into place, one by one.
- Press the lashes into place. Firmly press the lashes onto the liner to ensure a secure attachment.
And voila! You're done!
Warnings:
As with any cosmetic product, always perform a patch test prior to full application.
In case of eye contact, wash the eye thoroughly with clean water.
If you have a pre-existing eye condition consult a medical professional before use.
Do not use in MRI scans.


Youthphoria Beauty
Youthphoria Beauty Signature Faux Silk - Diamond
The innovative variation of clusters offers spurts of volume and depth exactly where needed. The diamond magnetic eyelash is suitable to wear everyday due to its modest length, perfect for day to night glam.
From flirty to seductive to glamorous, the Diamond lashes has you covered! This magnetic lash will make transitioning from a spectacular day to a stunning night a breeze. It's created from high quality faux silk, making them lightweight and soft to touch whilst looking dramatic and full bodied.
Directions:
Step 1. Try on the magnetic eyelashes - try on the lashes to check its fit, and trim if needed.
- The magnetic lashes should run across your upper lash line along your eyelid. Remember to ensure magnets are at the very end of the inner and outer sides of the lashes. This will help the lashes grip, meaning a more natural, comfortable look for you.
Step 2. Apply your magnetic eyeliner - ensure your eyelids are clean and dry.
- Shake the bottle and then apply a thick and even line of the magnetic liner on your natural lash line above your eyelids.
- While the liner is magnetic, you can also use as a normal liner. Just make sure you line the inner and outer corner of your lash line to ensure maximum grip. Let the liner dry for approximately 10 seconds and until the eyeliner is slightly tacky (about 80% dry).
Tip: apply two coats for extra strength. A thin line of magnetic eyeliner can be achieved by scraping the brush-tip against the inside of the eyeliner container.
Step 3. Magnetise your lashes onto the magnetic eyeliner - Using your fingers, place the magnetic lashes on the top liner you applied in step 2.
- Begin applying the lash from the inner corner to the outer corner of your lash line. This will allow the magnets to softly snap into place, one by one.
- Press the lashes into place. Firmly press the lashes onto the liner to ensure a secure attachment.
And voila! You're done!
;
Step 1. Try on the magnetic eyelashes - try on the lashes to check its fit, and trim if needed.
- The magnetic lashes should run across your upper lash line along your eyelid. Remember to ensure magnets are at the very end of the inner and outer sides of the lashes. This will help the lashes grip, meaning a more natural, comfortable look for you.
Step 2. Apply your magnetic eyeliner - ensure your eyelids are clean and dry.
- Shake the bottle and then apply a thick and even line of the magnetic liner on your natural lash line above your eyelids.
- While the liner is magnetic, you can also use as a normal liner. Just make sure you line the inner and outer corner of your lash line to ensure maximum grip. Let the liner dry for approximately 10 seconds and until the eyeliner is slightly tacky (about 80% dry).
Tip: apply two coats for extra strength. A thin line of magnetic eyeliner can be achieved by scraping the brush-tip against the inside of the eyeliner container.
Step 3. Magnetise your lashes onto the magnetic eyeliner - Using your fingers, place the magnetic lashes on the top liner you applied in step 2.
- Begin applying the lash from the inner corner to the outer corner of your lash line. This will allow the magnets to softly snap into place, one by one.
- Press the lashes into place. Firmly press the lashes onto the liner to ensure a secure attachment.
And voila! You're done!
;
Step 1. Try on the magnetic eyelashes - try on the lashes to check its fit, and trim if needed.
- The magnetic lashes should run across your upper lash line along your eyelid. Remember to ensure magnets are at the very end of the inner and outer sides of the lashes. This will help the lashes grip, meaning a more natural, comfortable look for you.
Step 2. Apply your magnetic eyeliner - ensure your eyelids are clean and dry.
- Shake the bottle and then apply a thick and even line of the magnetic liner on your natural lash line above your eyelids.
- While the liner is magnetic, you can also use as a normal liner. Just make sure you line the inner and outer corner of your lash line to ensure maximum grip. Let the liner dry for approximately 10 seconds and until the eyeliner is slightly tacky (about 80% dry).
Tip: apply two coats for extra strength. A thin line of magnetic eyeliner can be achieved by scraping the brush-tip against the inside of the eyeliner container.
Step 3. Magnetise your lashes onto the magnetic eyeliner - Using your fingers, place the magnetic lashes on the top liner you applied in step 2.
- Begin applying the lash from the inner corner to the outer corner of your lash line. This will allow the magnets to softly snap into place, one by one.
- Press the lashes into place. Firmly press the lashes onto the liner to ensure a secure attachment.
And voila! You're done!
Warnings:
As with any cosmetic product, always perform a patch test prior to full application.
In case of eye contact, wash the eye thoroughly with clean water.
If you have a pre-existing eye condition consult a medical professional before use.
Do not use in MRI scans.
Buy Now Pay Later Options available:
Pay with Bitcoin, Solana, USDC


